
Introduction
As soon as you start to write pieces of Mathematica code of any size you will face the problem of how to find and remove the bugs. Many people write software without using a debugger of any sort – they simply insert calls to 'Print' (or the equivalent in whatever language they are using) and study the behaviour of their program in that way. However, a debugger can certainly make this process easier – particularly for beginners.
Mathematica already contains some basic debugging functions. To see these in action simply append //TracePrint to a line of input. Unfortunately, TracePrint (and related functions) usually print too much information – by default, they print the details of every step. Some of these 'steps' can seem bizarre at first. For example,
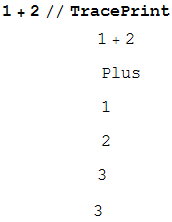
Here we see four intermediate steps, including the evaluation of 'Plus'. It is, of course, possible (if silly) to redefine Plus, so Mathematica has to check its 'value' before using it.
Although there are various ways to limit the output from the Trace functions, it is usually hard to restrict the output to just what is interesting – particularly when, almost by definition, you do not know what you are looking for!
The debugger console
Unlike most packages, M-Debug displays a notebook known as the "Debugger Console" as soon as it is loaded. Using this console you can perform many tasks – such as setting breakpoints – but in particular, you can start executing a piece of Mathematica code as if you had used the Enter key (or shift Return key), but under control of M-Debug. You can then step or run it between breakpoints to explore its behaviour in detail.
The Dbg experience
M-Debug is based on an earlier package known as Dbg. This is also available at MathSource (see bellow) because M-Debug requires Mathematica 5.0 (or better). One problem which users encountered with Dbg was that some operations only made sense in particular modes. The buttons on the M-Debug console become greyed out and inoperative whenever the action they represent is inappropriate. This helps to avoid confusion.
Numbered steps
In tricky debugging operations it may be necessary to run a piece of code several times through M-Debug. To help with this, every step is numbered, and these numbers will repeat from run to run (assuming your code can repeat unchanged from run to run) and this can help in many ways. Suppose, for example, that your code mysteriously fails at step 87510. You might find it useful to debug the code again and run it to step 87450 (say) and then single-step it until it failed.
Infinite loops
It is all to easy to write Mathematica code that gets into an infinite loop. It is also possible see my notes about performance to write code which contains mistakes which cause arithmetic code to effectively start doing algebra – causing a disastrous slowdown. Problems of this sort can be resolved using M-Debug by using a button that interrupts executing code and lets you examine what is going on. It is even possible to resume execution after an interrupt.
Obtaining the package
M-Debug is available free from http://library.wolfram.com/infocenter/MathSource/826/